How to recover files and folders using Shadow Volume Copies
Lawrence Abrams
- May 14, 2016
- Read 280,621 times
What are Shadow Volume Copies?
Since Windows XP Service Pack 2 and Windows Server 20013, Microsoft has bundled a technology into their operating systems called Volume Shadow Copy Service or VSS. This service allows Windows to take automatic or manual backups, or snapshots, of the current state of the files on a particular volume (drive letter). The important part of this process is that these backups can be taken of files even if they are open. Therefore, this provides a mechanism that backup programs and Windows can use to retain a reliable history of a computer's files.
When these backups are created they are stored in a special container called a Shadow Volume Copy. These Shadow Volume Copies can then be used by backup software, utilities, or Windows to restore files that may have been deleted or altered in some manner. When a backup is created using the Volume Shadow Copy Service, the files are backed up using a versioning method so that only the changes in a file are backed up, rather than the whole file. This allows for many versions of the same file to be available without using a large amount of disk space.
As you can see this technology is very useful as it allows us to recover deleted or altered files if necessary. I have found many uses for this feature, such as recovering an old saved game, restoring files that have been encrypted by ransomware, or restoring a file that I deleted by accident.
In this tutorial, I have outlined two methods that you can use to restore files from a shadow volume copy. The first method uses the built-in Windows feature called Previous Versions. The second method is to use a tool called Shadow Explorer, which allows you to browse and restore files and folders from the various shadow copies on a computer.
How to Recover Files using Windows Previous Versions
Windows has a feature called Previous Versions that allows you to restore earlier copies of a particular file from Shadow Volume Copy snapshots. The method described below is only to restore individual files from the Shadow Volume Copies. If you wish to restore an entire folder, please read this section instead.
To restore individual files, open the folder that contains the file you wish to recover as shown below.
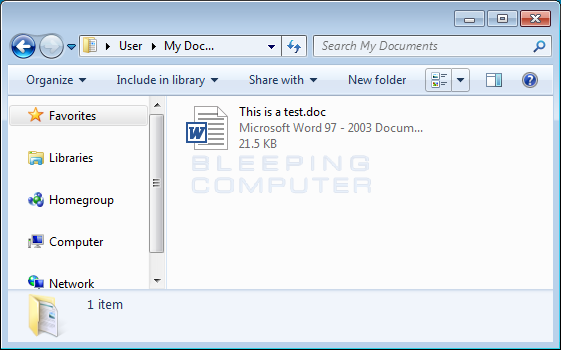
Now right-click on the file you wish to recover and select properties as shown below.
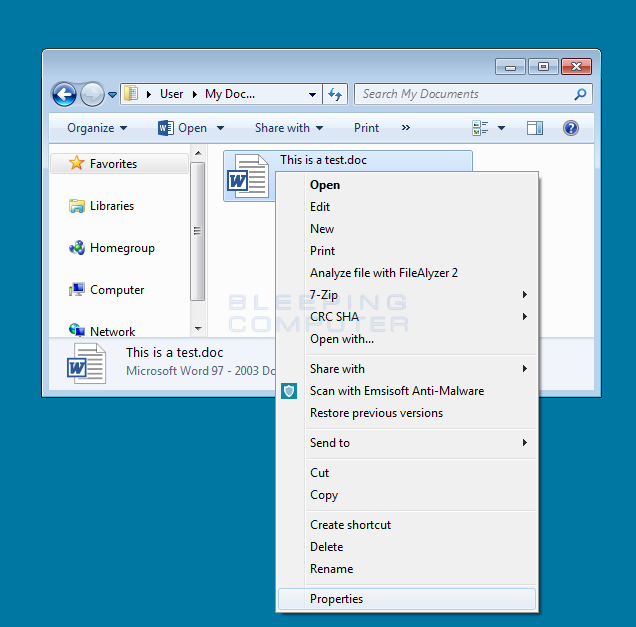
In the context-menu that appears, click on the Properties option. This will open the properties for the file. When the properties screen opens, click on the Previous Versions tab. You will now be at a screen that displays all the previous versions that were saved in shadow copies. Note that each version will have the corresponding date and time that it was backed up.
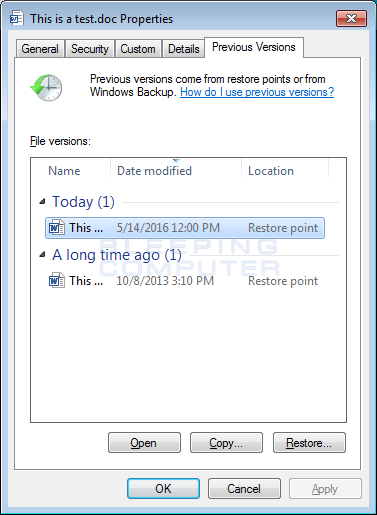
To recover a previous version of a file you can click on the Copy or Restore buttons. The Copy button will restore the file to a location you specify, while the Restore button will overwrite the existing file on your hard drive with the previous version. I suggest you you create a folder on your hard drive and use the Copy button to restore a previous version to that folder to make sure it's the one you want.
To do this, click on the Copy button and Windows will prompt you for a folder to restore the file to.
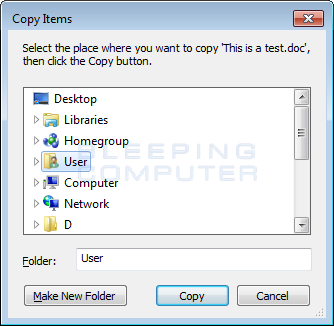
Browse to the folder or create a new one that you wish to restore the previous version to. When you are ready, click on the Copy button.
Windows will now recover the previous version of the file from the Shadow Volume Copies and save it in the specified folder. You can now close the properties Window and access your file as necessary.
If you wish to learn how to recover an entire folder, you can read the next section.
How to Recover Folders using Windows Previous Versions
Recovering an entire folder using Windows Previous Versions is for the most part the same as recovering a file. The steps, though, are slightly different so I felt a dedicated section would be helpful.
To recover a folder, open the folder that contains the file you wish to restore as shown below.

Now right-click on empty space in the folder to open the context-menu for the folder as shown below.
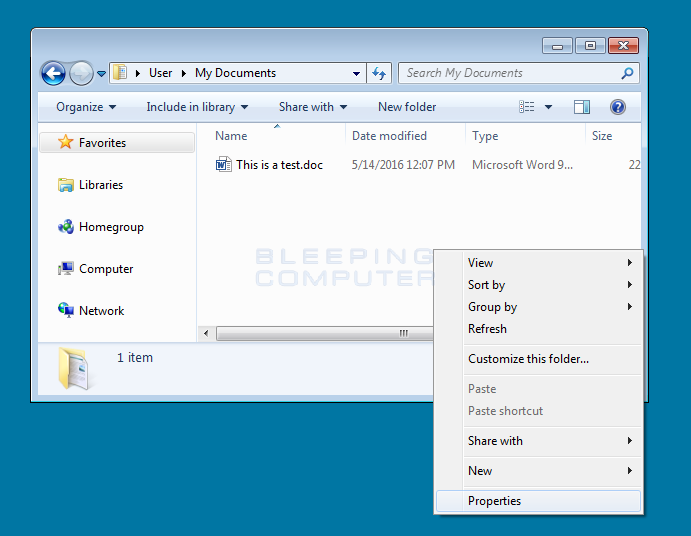
In the context-menu that appears, click on the Properties option. This will open the properties for the folder. When the properties screen opens, click on the Previous Versions tab. You will now be at a screen that displays all the previous versions of the folder that were saved in shadow copies. Note that each version will have the corresponding date and time that it was backed up.
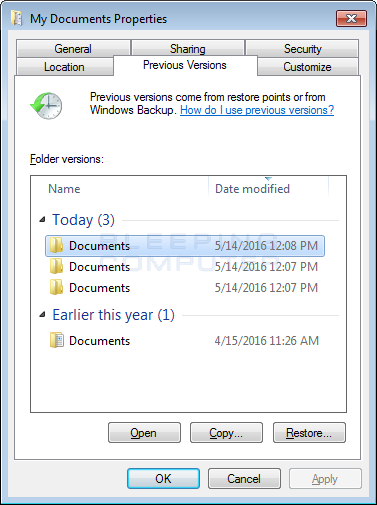
To restore a previous version of a folder you can click on the Copy or Restore buttons. The Copy button will restore the folder to a location you specify, while the Restore button will overwrite the existing folder on your hard drive with the previous versions of all the files contained in it. I suggest you you create a folder on your hard drive and use the Copy button to restore a previous version to that folder so that you do not mistakenly overwrite good files.
To do this, click on the Copy button and Windows will prompt you for a location to restore the folder.

Browse to the folder or create a new one that you wish to restore the previous version of the folder. When you are ready, click on the Copy button.
Windows will now restore the entire previous version of the folder from the Shadow Volume Copies into the specified folder. You can now close the properties Window and access your restore folder to see if it has the files you need.
Use ShadowExplorer to Recover Files and Folders from Shadow Volume Copies
To restore files and folders from Shadow Volume Copies you can also use a program called ShadowExplorer. Personally, I prefer this method over Previous Versions as it I feel it is easier to find and restore the versions of the files you need in an easy to use interface. When downloading the program, you can either use the full install download or the portable version as both perform the same functionality.
ShadowExplorer can be downloaded from this link: Shadow Explorer Download Link
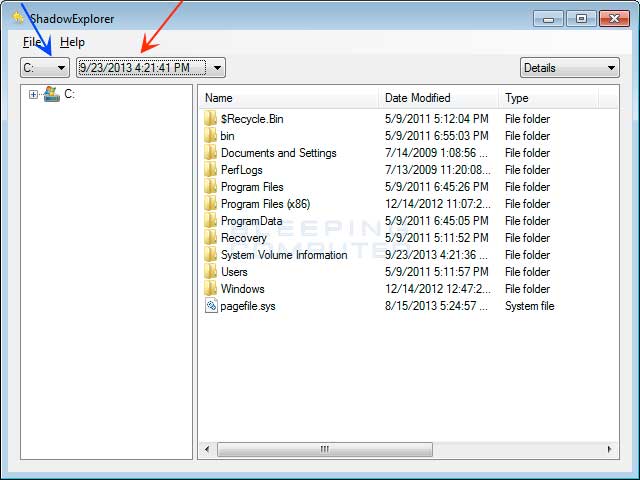
Once you download and start ShadowExplorer, you will be shown a screen listing all the drives and the dates that a shadow copy was created. Select the drive (blue arrow) you wish to recover files or folders from and the date (red arrow) that you wish to restore from. This is shown in the image below.
Then navigate to the folder or files you wish to recover. When ready right-click on the folder or file and select Export as shown below.
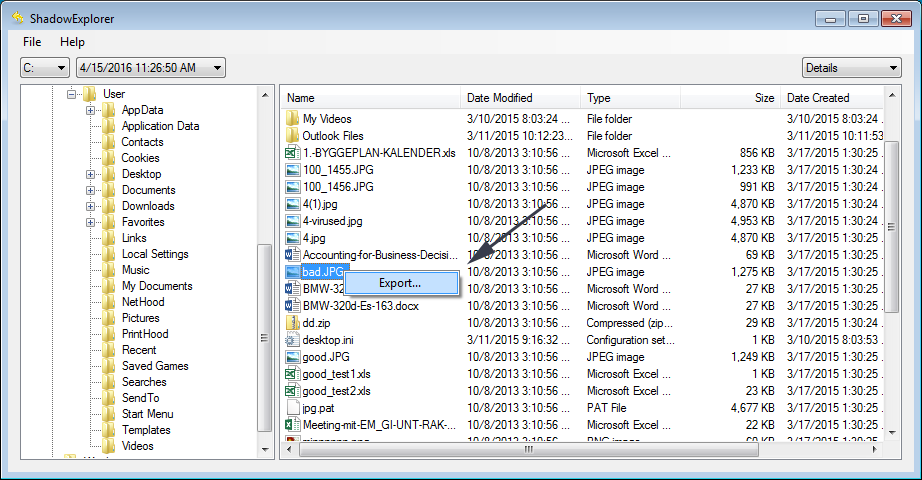
When you click on Export, ShadowExplorer will display a prompt asking you where to restore the files to as shown below.
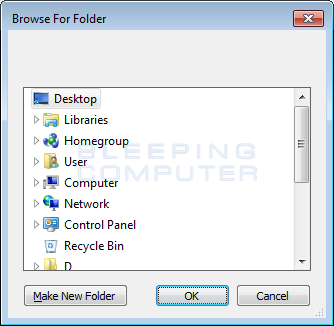
Navigate to or create a new folder to recover your files to and then click on the OK button. ShadowExplorer will now restore the files to that location.
Why does ransomware try to delete the Shadow Volume Copies
A common tactic by computer ransomware infections is to delete the Shadow Volume Copies when it encrypts a victim's computer. As you now see how easy it is to recover files using Shadow Volume Copies, the ransomware deletes them so that a victim is unable to do so.
When a ransomware attempts to delete the shadow volume copies it will usually use the command:
C:\Windows\Sysnative\vssadmin.exe" Delete Shadows /All /Quiet
When this command is executed, Windows will display a UAC prompt asking if the victim would like the command to execute with adminsitrator privileges. If the user allows the command to continue, vssadmin.exe will delete all the shadow volume copies for all drives on the computer. In some cases, Ransomware will use the powershell or WMIC commands to delete the SVCs instead.
Regardless of how these copies are deleted, ransomware removes the SVCs so that you are unable to restore files encrypted by the ransomware.


