Using Blacklight to detect and remove Rootkits from your computer
Lawrence Abrams
- May 18, 2006
- Read 157,045 times
Table of Contents
Rootkits are scary and becoming a larger and larger menace to our computers every day. In the past if our computers were infected with a piece of malware, we simply removed it and we were clean of the infection. Now that rootkits are commonly bundled with other malware, this cleaning process has become even harder to do. This tutorial will cover how to use F-Secure Blacklight to scan your computer for rootkits and help you to remove them.
Note: Blacklight is scheduled to not be available past June 1st 2006. There are rumors though that it may be extended.
Using Blacklight to remove rootkits from your computer
The first step is to download Blacklight. You can download Blacklight directly from F-Secure's web site at this link:
Once you click on the above link you will be presented with a prompt asking what you would like to do with the file. I suggest you save the file directly to your desktop where we will run it from there. Once the file has finished downloading you will see an icon similar to the one in Figure 1 below.
![]()
Figure 1. F-Secure Blacklight Icon
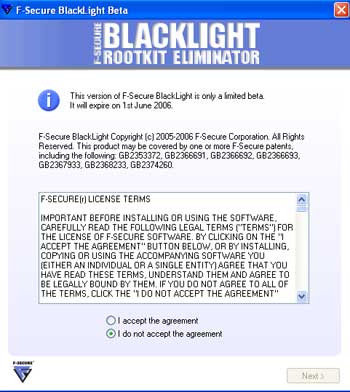
To start the program simply double-click on the blbeta.exe icon and you will be presented with the license agreement as shown in Figure 2 below.

Figure 2. F-Secure Blacklight Agreement
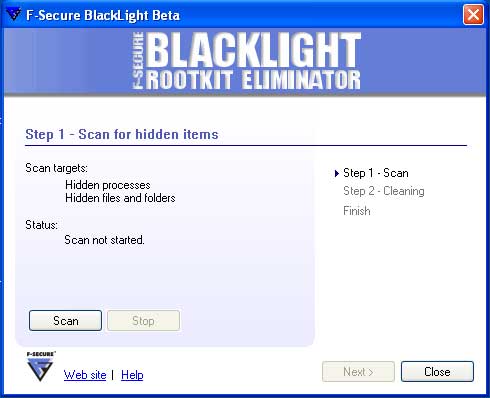
Select the option that is labeled I accept the agreement and then press the Next button. You will now be presented with a screen similar to the one shown in Figure 3 below.

Figure 3. Begin the scan
To start scanning your computer for possible rootkits, press the Scan button. Blacklight will now start scanning your computer for any hidden files or processes. As it scans your processes and files it will update its status to reflect what it is scanning and if it has found any hidden items as shown in Figure 4 below.

Figure 4. Scanning your system for rootkits
When the scanning is done, the Next button will become available and you should click on it. If Blacklight did not find any hidden items you will see a screen showing that no hidden items were found. You can then press the Exit button to exit the program as Blacklight did not find any rootkits on your computer. If on the other hand, Blacklight did find some hidden items, you will be presented with a screen similar to Figure 5 below showing a list of the processes and files hidden on your computer.

Figure 5. Clean rootkits found by Blacklight
In the Clean hidden items screen, as shown in Figure 5 above, you will see a list of the processes and programs that are hidden on your computer. Next to each file is an icon that designates the type of item it is. These types are explained in Table 1 below.
Table 1. Different types of found items in Blacklight
|
Icon
|
Description
|
|
|
This icon represents a file that is being hidden. |
|
|
This icon represents a process that is being hidden. |
|
|
This process represents a process and its associated file that is being hidden. |
In order to tag a particular file or process that you would like to clean, you need to left-click once on an entry with your mouse so that it is highlighted, and then press the Rename button. When you do this, the action will change from None to Rename. Once you set a file to Rename, you can untag it by pressing the None button so that no action is performed on this particular item.
If you would like more information about the entry, you can double-click on it with your mouse. This will bring up a small screen showing you more detailed information about the file or process such as the location of the file, the description information, and the company information. It is common for the description and company information to be blank so do not be worried if there is nothing listed there.
It is important to note that rootkits can hide legitimate processes and files. For example the rootkit in the screen above is hiding Explorer.EXE and Winlogon.exe which are both legitimate Microsoft Windows files and processes. So when selecting the files you would like to rename please make sure you are only renaming the malware files as renaming the wrong files can cause problems with your Windows installation.
After you have selected all of the files you would like to rename, you should press the Next button. A warning screen will now show stating that renaming legitimate files can cause Windows not to operate properly. If you would still like to continue renaming the files, put a checkmark in the checkbox labeled I have understood the warning and wish to continue and then press the OK button. You should then press the Restart Now, and then the OK button again, to restart your computer and rename the select files.
|
For Advanced Users: When Windows starts it checks this Registry value and will either delete or rename files listed in this value based on the instructions given. Unfortunately there are some malware which poll this value, and when they find any data in it, clears this value so that Windows will not perform the desired operation on startup. When this happens, you may need to use alternate methods of removing the rootkit such as a boot cd or other offline removal process. |
When the computer reboots it will rename the files with a .ren extension. Because these files are no longer be loaded at startup, they will now become visible so that you can delete them. For example, if we had renamed the files:
klgcptini.dat
fux87.ini
They would now be named:
klgcptini.dat.ren
fux87.ini.ren
As long as these files are confirmed as being malware, you can then delete them from your computer. Blacklight when it performs a scan will create a log file in the same folder that you ran the program from. If you followed the steps in this tutorial, that folder would be your Windows Desktop. The file name of the log file will start with fsbl- followed by the data and some other numbers. An example is fsbl-20060518203951.log.
Once these rootkit files have been deleted, it is advised that you scan your computer with an antivirus and an antispyware software in order to remove any leftover files. Most of the programs below have a free trial use that expires after a certain amount of time.
Reputable antispyware programs are:
Ad-Aware [Tutorial]
Spybot - Search and Destroy [Tutorial]
SpySweeper
Recommended antimalware and antivirus software are:
AVG Antivirus (Free version available for personal use)
Avast (Free version available for personal use) [Avast Tutorial]
Panda Activescan (Free online antivirus scanner)
TrendMicro Housecall (Free online antivirus scanner)
Kaspersky Antivirus
Nod32
Ewido Antimalware
Now that you know how to use Blacklight you have another tool in your arsenal in the growing threat of rootkits. As rootkits are now commonly bundled with other malware, if you become infected with a spyware, worm, or other malware, you should run this program and let it check for rootkits as well. If you have concerns about renaming and deleting any found files yourself, feel free to post the log of your scan as a topic in our Am I infected? What do I do? forum. Someone will examine your log and then let you know what should be done.
--
Lawrence Abrams
Bleeping Computer Advanced Internet Security Concept Series
BleepingComputer.com: Computer Help & Spyware Removal


