How to use CleanUp! to protect your privacy
Table of Contents
- Introduction
- Download CleanUp!
- Install CleanUp!
- Configure CleanUp!
- Run CleanUp!
- Finish
- Add CleanUp! to right click
CleanUp! is a freeware utility created by Steven Gould to protect your privacy. This tool has the ability clean your browser's history, bookmarks, favorites, cookies as well as other privacy related locations on your computer.
Download CleanUp!
Download the file from the download page located here:
CleanUp! Download Link
Once download, click the Save button, instead of the "open" or "run" button.
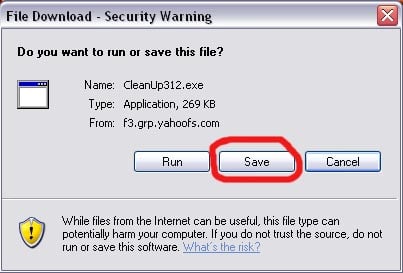
Figure 1: Download the file
Save it to someplace you know, like your desktop.
Double-click the file to install it. If you downloaded the "zip" file, use a program such as WinZip to unzip it. Then double-click the installation file. Check the box that says I agree with the above terms and conditions.
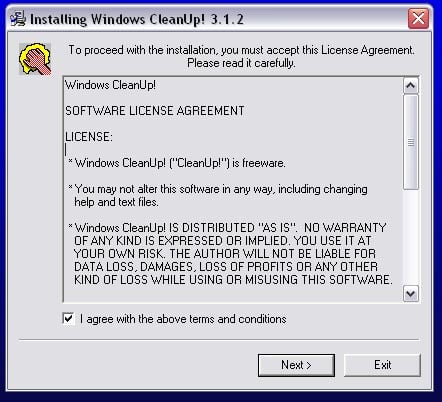
Figure 2: Start Install of Cleanup!
Click Next. Now you choose where to install it in. I recommend you keep it at default, C:\Program Files\CleanUp!.
Click Start. Wait for it to install. Once it is done installing, you should get this screen:
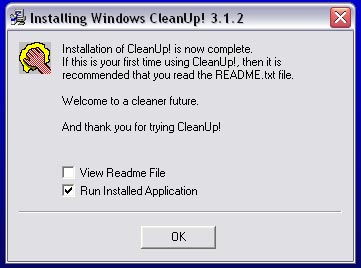
Figure 3: Finishing Install
Uncheck View ReadMe File and make sure Run Installed Application is checked. Then click Ok.
Configure CleanUp!
Now CleanUp should be opened up. If not, find where you installed it and open it up. You should see the below image. Click on Options button as circled below.
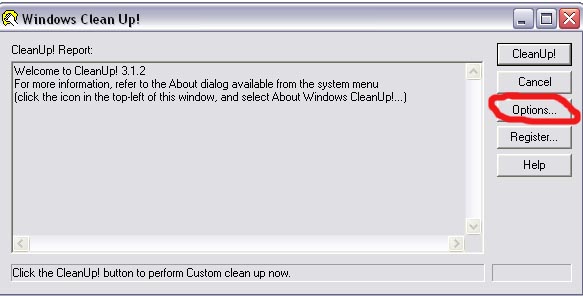
Figure 4: Configure CleanUp!
Drag the bar to "Standard CleanUp!" so that it looks like this:
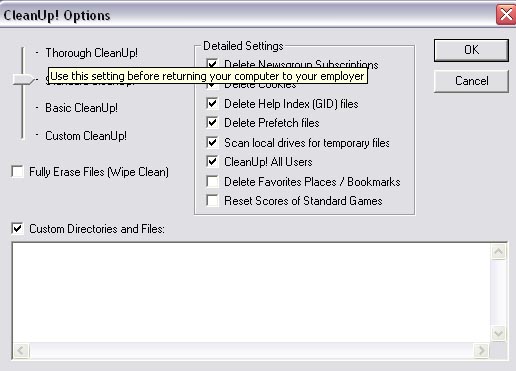
Figure 5: Setting Options
If, like myself, you have a lot of valuable cookies stored on your computers (saved passwords, saved logins, etc) and would not like to lose them, uncheck Delete Cookies. The bar will now have moved to Custom Cleanup. Click OK.
Now we run the program I recommend you close any browsers as it might interfere with what we are cleaning. You might want to also turn off your
sound if you do not like toilet flushing noises (I personally find it funny). Click the CleanUp! button.
When it is finished, a box will pop up saying CleanUp! is finished but it needs to logoff. Before logging off, to satisfy your curiosity, Grab the top part of the box and move it the side so you can see the window underneath it. It will tell you how much space CleanUp freed. Then, click the Yes button when it asks you to log off. Log back on and boom, there you have it, a Cleaned Up computer
Here's a cool little trick to add CleanUp to the list when you right click the Start in your Start Menu. This makes it much more convenient to use CleanUp. To do this follow these steps:
-
Open up Notepad.
-
Copy and paste the following bolded text between the dotted lines into the opened notepad:
---------------------------
Windows Registry Editor Version 5.00[HKEY_CLASSES_ROOT\Directory\shell\CleanUp]
@="CleanUp!"[HKEY_CLASSES_ROOT\Directory\shell\CleanUp\command]
@="C:\\Program Files\\CleanUp!\\Cleanup.exe"
---------------------------- -
Save the notepad file as cleanup.reg to your desktop.
-
Exit notepad.
-
On the desktop, double click the cleanup.reg file.
-
Press the Yes button when it asks if you want to merge it into your registry.
You now have the CleanUp! option as part of your right-clicking on the start menu.
This tutorial has been written by Matt (mpfeif101) from AntiSpyware Net


