How to configure the Windows Firewall in Windows XP
Lawrence Abrams
- March 24, 2004
- Read 186,206 times
Table of Contents
- Introduction
- How to enable or disable the Windows Firewall in XP
- How to manage exceptions to the Windows Firewall
- Conclusion
Windows XP comes with a built-in firewall called Windows Firewall. For people who do not want to spend the money on a commercial software firewall, this firewall will be more than enough to protect your computer. By default, Windows Firewall disables all incoming traffic to your computer, including ICMP traffic, which consists of pings. Just like all other firewall's you can specify which services/ports you would like to have open so that other computers can connect to yours. This will allow you to open up ports for services like web servers, mail servers, game servers, etc. Windows Firewall comes configured with basic services that you can enable to be opened, and you also have the ability to add other rules for incoming traffic that are not already configured. If you would like, you also have the ability to enable incoming ICMP traffic, so that you can ping and traceroute to your computer.
How to Enable od Disable the Windows Firewall in XP
Note: In order to enable the Windows Firewall you must be logged in as an Administrator.
Click on the Start button and then click on Run.
In the Open field, type control and press OK.
This will launch the control panel. If you see a selection similar to Figure 1, click on Switch to Classic View option which is indicated by the red arrow in the figure below.
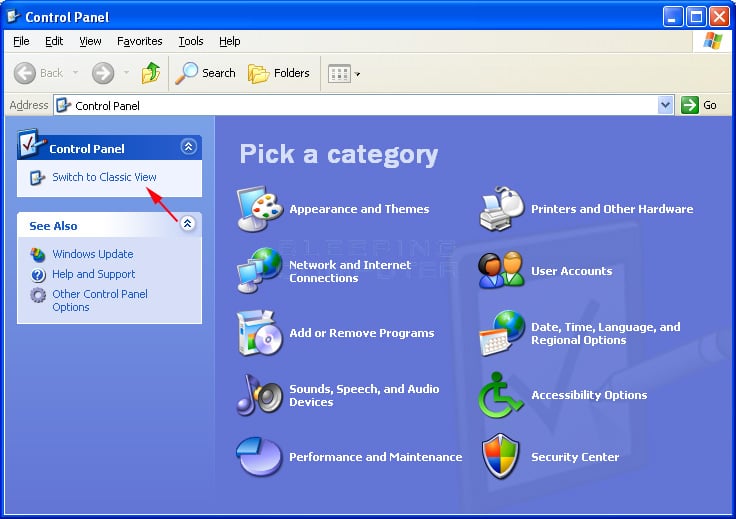
Figure 1: Control Panel in Category View
After clicking on classic view you should now see a screen that looks like Figure 2. You will then want to double click on Windows Firewall as shown in the image below.
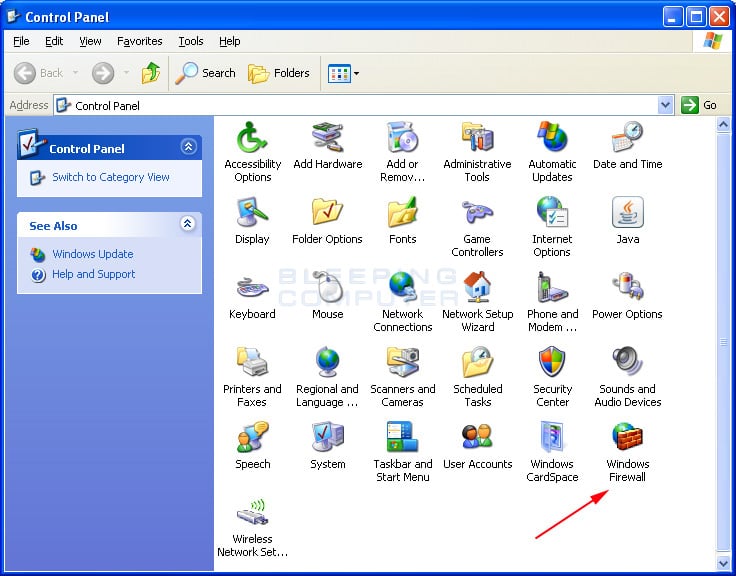
Figure 2. Control Panel in Classic Mode
After double clicking on Windows Firewall icon, you will be presented with the Windows Firewall control panel that allows you to configure the settings for the firewall.
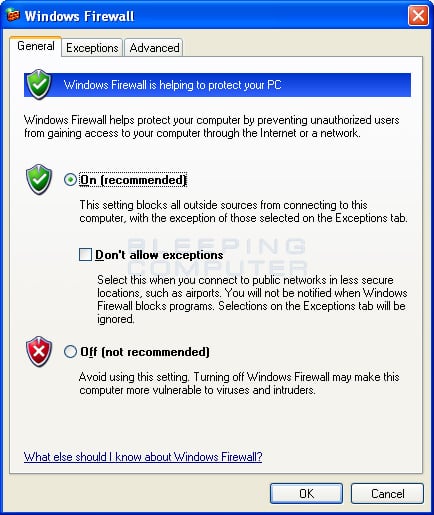
Figure 3. Windows Firewall
To enable the firewall, simply make sure the On (recommended) option is selected. If you wish to disable the firewall, simply select the Off (not recommended) option. You will also notice that there is a checkbox labeled Don't allow exceptions. If this option is checked then any rules, or exceptions, that you create to allow outside traffic to reach your computer will be disabled. Exceptions will be explained in more detail in the following section.
How to manage exceptions to the Windows Firewall
When the Windows Firewall is enabled it will not allow any remote computer connect to yours. There are situations, though, that you may wish to allow a remote computer connect to yours such as if you are running a web server, sharing files or printers on your computer, using certain P2P programs, or running other services that require remote connections to work. To allow these types of connections we need to enable them as exceptions in the Windows Firewall. For those of you who are familiar with configuring hardware firewalls, this is similar to port forwarding.
To manage your exceptions you need to open the Windows Firewall as described in the previous section. Once the Windows Firewall control panel is open you should click on the Exceptions tab. This will change the screen to one that looks similar to the one below.
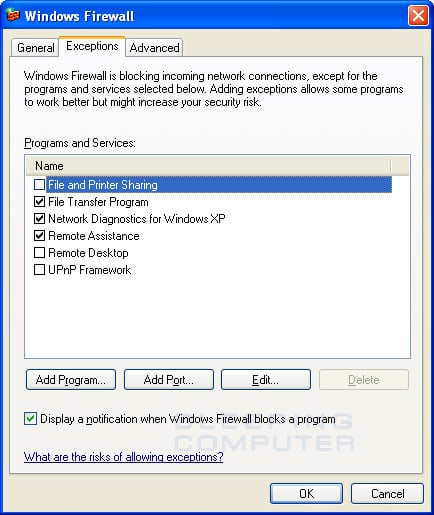
Figure 4. Windows Firewall Exceptions Screen
In this screen you can select predefined services that you would like to enable so that remote computers can access them. If you do not plan on allowing any remote computer to access yours, please make sure there are no options checked.
When adding exceptions you have two ways of doing it. The first method is to add a program that you would like remote computers to access by clicking on the Add Program... button. Doing this will tell Windows Firewall to allow remote connections to any ports that the program uses. The second, and safer, option is to instead only add specific TCP/UDP ports that you require to be connected to by using the Add Port button.
When you click on the Add Port button a new dialog box will open that allows you to configure the necessary information for the exception as shown below.
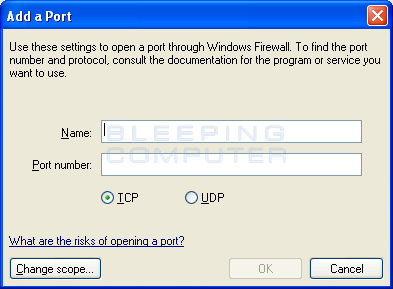
Figure 5. Add a Port
In the Add a Port dialog box, you should give a descriptive title to the exception and then enter the port that needs to be opened. You should then select TCP or UDP depending on what type of port it is. If you need to open a port for both TCP and UDP, you will need to create two separate exceptions where one is for UDP and the other is for TCP. If you are not sure what port should be opened to allow your applications to work, you should check the documentation that came with your program.
As an example, let's create an exception that allows your computer to act as a web server that can be reached by other computers. The default configuration for a web server is for it to listen for connections on TCP port 80. To do this we would create an exception as shown below:
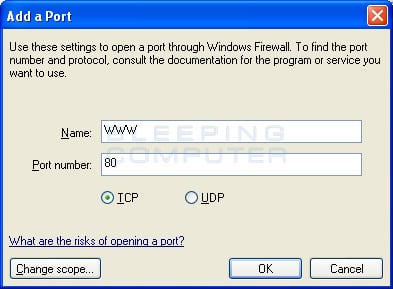
Figure 6. Creating an exception for the http protocol
As you can see in the image above, we have created an exception called WWW that allows TCP port 80, which is the port for a web server, to be connected to by remote computers. Once you press the OK button, the exception will be added and automatically checked as shown in the image below.
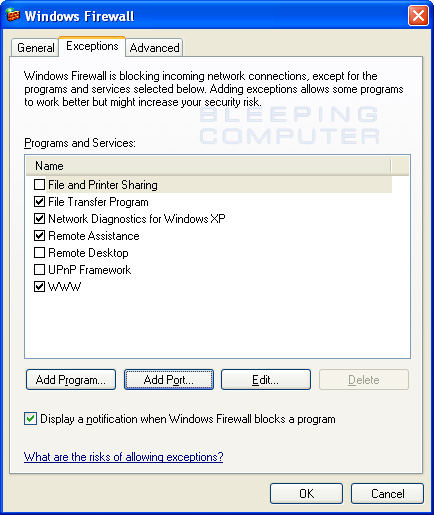
Figure 7. The WWW Exception enabled in Windows Firewall
As you can see the new WWW exception has been created and automatically enabled by Windows Firewall. You can then press the OK button to exit the Windows Firewall control panel.
One thing to remember is that when working with exceptions, if you have the Don't allow exceptions checkbox checked in the General settings tab of the Windows Firewall, all of your exceptions will be disabled until you uncheck that box.
As you can see, you have a fairly powerful firewall at your disposal for absolutely free. There are some shortcomings, such as not monitoring outbound connections, but it will do the job of securing your computer from hackers on the Internet. If you have any questions on how to use the Windows XP Firewall, please ask us in the AntiVirus, Firewall and Privacy Products and Protection Methods forum.
Revision Information:
01/12/11: Updated the tutorial to use the most relevant information and images.


