Several people told me that using Shared Folders with Puppy Linux (FossaPup64 9.5 in my case) running as a Virtual Machine on a Windows Host was troublesome and suggested using different sharing techniques instead, but I finally managed to get the function to work and, as a total Puppy Linux noob, could have really used a walkthrough like this on how to do it. Hope it helps you.
Credit to BologneChe at the Puppy Linux Discussion Forum for his idea in getting this working, along with mikewalsh, who also answered my cries for help and provided the step-by-step Noob type instructions I needed.
Pre-Requisites
This walkthrough assumes the following.
Oracle VM Host: Windows 10
Oracle VM Guest: FossaPup64 Version 9.5 (Already Installed as a Frugal install - not running as a bootable Live CD/USB)
Oracle VM VirtualBox: Version 6.1.26
Each step is accompanied by a snapshot and was taken it was being done. Note again that this How-To assumes your FossaPup is already installed to its own Oracle Virtual Disk Image (.vdi) partition as a frugal install that automatically saves its state each time it's restarted, or shutdown and then started up again.
20 Easy to Follow Steps to get VBox Shared Folders working
1. Once you have FossaPup installed and running in your Oracle Virtual Machine, click on Menu > Setup > quickpet fossa

2. In the Quickpet FossaPup64 window that opens, first select the Useful Tab and then click devx

3. Select devx_fossapup64_9.5.sfs as the file you want to download and then OK

4. Select ftp.nluug.nl as the mirror and then click the Download SFS file button

5. Wait until the download completes and then click OK on the SFS-Load requestor

6. On the next SFS-Load request, click the Quit button to not run the application

7. Click the kernel src button to install kernel sources

8. Select kernel_sources-5.4.53-fossapup64.sfs as the file to download and click OK

9. Select ftp.nluug.nl as the mirror and then click the Download SFS file button

10. Wait until the download completes and then click OK on the SFS-Load requestor

11. Click the Quit button once again to return to the Quickpet FossaPup64 main window

12. Close the Quickpet FossaPup64 main windows by clicking the X at the top right or the Cancel button

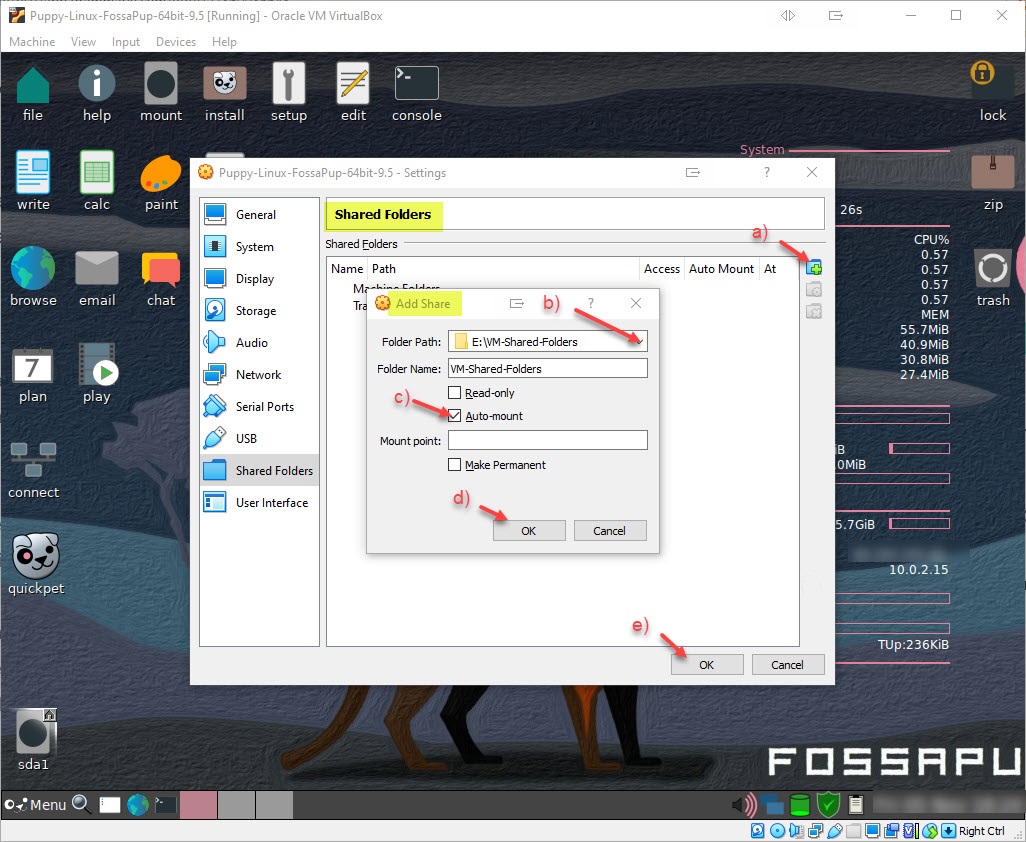
13. Specify your Shared Folder on your Windows Host by clicking Devices > Shared Folder > Shared Folder Settings...

14. Create your Shared Folder settings (E:\VM-Shared-Folders in the example below)
a ) Click the + to add a new shared folder to your Puppy VM
b ) Browse to and select the desired folder's path on your Host
c ) Check Auto-mount
d ) Click OK on the Add Share window
e ) Click OK again to close out of the main Shared Folders window

15. Now load the Guest Additions CD image by clicking Devices > Insert Guest Additions CD image... (Current VBox Guest Additions version at the time of writing is VBoxGuestAdditions_6.1.26.iso)

16. Reboot your Puppy Virtual Machine by clicking Menu > Exit > Reboot to allow all new settings to take effect

17. The Guest Additions ISO will appear on your Desktop as sr0. Click it to open its contents in Rox-Filer, right-click the VBoxLinuxAdditions.run file and select Run in Terminal

18. VBox Guest Additions will now install. When the installation is complete, hit the Enter key on your keyboard as instructed to close the Terminal window

19. Close the sr0 drive window, open pMount and (un)Mount the VBOX CD-ROM - Now that VBoxLinuxAdditions have been installed, it's no longer needed.

20. Using ROX-Filer, or in the case of the snapshot below, Xfe File Manager that I chose to install, browse to /media/sf_VM-Shared-Folders (or whatever your shared folder name is on your Host, preceded by sf_)

Done!
Anything in your Shared Windows Host folder can now be accessed.
Hope this walkthrough "How To" tutorial helped you out.
Regards,
Andrew
.
Edited by achzone, 05 November 2021 - 06:26 AM.


 Back to top


